Saturday, March 25, 2017

Nerd Food: Northwind, or Using Dogen with ODB - Part IV

Nerd Food: Northwind, or Using Dogen with ODB - Part IV

So, dear reader, we meet again for the fourth and final instalment of our series of posts on using Dogen with ODB! And if you missed an episode - unlikely as it may be - well, fear not for you can always catch up! Here are the links: Part I, Part II and Part III. But, if you are too lazy and need a summary: all we've done thus far is to install and setup an Oracle Express database, populate it with a schema (and data) and finally code-generate an ORM model with Dogen and ODB.

I guess it would not be entirely unfair to describe our adventure thus far as a prelude; if nothing else, it was a character building experience. But now we can finally enjoy the code.

Building Zango

Assuming you have checked out zango as described in Part III and you are sitting on its containing directory, you can "configure" the project fairly simply:

$ . /u01/app/oracle/product/11.2.0/xe/bin/oracle_env.sh
$ cd zango
$ git pull origin master
$ cd build
$ mkdir output
$ cd output
$ CMAKE_INCLUDE_PATH=/full/path/to/local/include CMAKE_LIBRARY_PATH=/full/path/to/local/lib cmake ../.. -G Ninja
-- The C compiler identification is GNU 6.3.0
<lots of CMake output>
-- Generating done
-- Build files have been written to: /path/to/zango/build/output

As always, do not forget to replace /full/path/to/local with your path to the directory containing the ODB libraries. If all has gone according to plan, CMake should have found ODB, Boost, Dogen and all other dependencies we have carefully and painstakingly setup in the previous three parts.

Once the configuration is done, you can fire up Ninja to build:

$ ninja -j5
[1/100] Building CXX object projects/northwind/src/CMakeFiles/northwind.dir/io/category_id_io.cpp.o
<lots of Ninja output>
[98/100] Linking CXX static library projects/northwind/src/libzango.northwind.a
[99/100] Building CXX object CMakeFiles/application.dir/projects/application/main.cpp.o
[100/100] Linking CXX executable application

That was easy! But what exactly have we just built?

The "Application"

We've created a really simple application to test drive the northwind model. Of course, this is really not how your production code should look like, but it'll do just fine for our purposes. We shall start by reading a password from the command line and then we use it to instantiate our Oracle database:

    const std::string password(argv[1]);
    using odb::oracle::database;
    std::unique_ptr<database>
        db(new database("northwind", password, "XE", "localhost", 1521));

We then use this database to read all available customers:

std::list<zango::northwind::customers>
load_customers(odb::oracle::database& db) {
    odb::oracle::transaction t(db.begin());

    std::list<zango::northwind::customers> r;
    auto rs(db.query<zango::northwind::customers>());
    for (auto i(rs.begin ()); i != rs.end (); ++i)
        r.push_back(*i);
    return r;
}

Please note that this is a straightforward use of the ODB API, but barely scratches the surface of what ODB can do. ODB supports all sorts of weird and wonderful things, including fairly complex queries and other great features. If you'd like more details on how to use ODB, you should read its manual: C++ Object Persistence with ODB. It's extremely comprehensive and very well written.

Once we have the customers in memory, we can start to do things with them. We can for example serialise them to a Boost serialisation binary archive and read them back out:

    boost::filesystem::path file("a_file.bin");
    {
        boost::filesystem::ofstream os(file);
        boost::archive::binary_oarchive oa(os);
        oa << customers;
    }

    std::cout << "Wrote customers to file: "
              << file.generic_string() << std::endl;

    std::list<zango::northwind::customers> customers_from_file;
    {
        boost::filesystem::ifstream is(file);
        boost::archive::binary_iarchive ia(is);
        ia >> customers_from_file;
    }

This is where hopefully you should start to see the advantages of Dogen: without writing any code, we have full serialisation support to all classes in the model - in addition to ODB support, of course.

Another very useful feature is to dump objects into a stream:

    for (const auto& c : customers_from_file)
        std::cout << "Customer: " << c << std::endl;

The objects are written in JSON, making it easy to post-process the output with JSON tools such as JQ, resulting in a nicely formatted string:

{
  "__type__": "zango::northwind::customers",
  "customer_id": {
    "__type__": "zango::northwind::customer_id",
    "value": 90
  },
  "customer_code": "WILMK",
  "company_name": "Wilman Kala",
  "contact_name": "Matti Karttunen",
  "contact_title": "Owner/Marketing Assistant",
  "address": "Keskuskatu 45",
  "city": "Helsinki",
  "region": "",
  "postal_code": "21240",
  "country": "Finland",
  "phone": "90-224 8858",
  "fax": "90-224 8858"
}

Dogen supports dumping arbitrarily-nested graphs, so it's great for logging program state as you go along. We make extensive use of this in Dogen, since - of course - we use Dogen to develop Dogen. Whilst this has proven invaluable, we have also hit some limits. For example, sometimes you may bump into really large and complex objects and JQ just won't cut it. But the great thing is that you can always dump the JSON into PostgreSQL - very easily indeed, given the ODB support - and then run queries on the object using the power of JSONB. With a tiny bit more bother you can also dump the objects into MongoDB.

However, with all of this said, it is also important to notice that we do not support proper JSON serialisation in Dogen at the moment. This will be added Real-Soon-Now, as we have a real need for it in production, but its not there yet. At present all you have is this debug-dumping of objects into streams which happens to be JSON. It is not real JSON serialisation. Real JSON support is very high on our priority list though, so expect it to land in the next few sprints.

Another useful Dogen feature is test data generation. This can be handy for performance testing, for example. Let's say we want to generate ~10K customers and see how Oracle fares:

std::vector<zango::northwind::customers> generate_customers() {
    std::vector<zango::northwind::customers> r;
    const auto total(10 * 1000);
    r.reserve(total);

    zango::northwind::customers_generator g;
    for (int i = 0; i < total; ++i) {
        const auto c(g());
        if (i > 100)
            r.push_back(g());
    }

    return r;
}

Note that we skipped the first hundred customers just to avoid clashes with the customer_id primary key. Now, thanks to the magic of ODB we can easily push this data into the database:

void save_customers(odb::oracle::database& db,
    const std::vector<zango::northwind::customers>& customers) {

    odb::transaction t(db.begin());
    for (const auto c : customers)
        db.persist(c);
    t.commit();
}

Et voilá, we have lots of customers in the database now:

SQL> select count(1) from customers;

  COUNT(1)
----------
      9990

To be totally honest, this exercise revealed a shortcoming in Dogen: since it does not know of the size of fields on the database, the generated test data may in some cases be too big to fit the database fields:

Saving customers...
terminate called after throwing an instance of 'odb::oracle::database_exception'
  what():  12899: ORA-12899: value too large for column "NORTHWIND"."CUSTOMERS"."CUSTOMER_CODE" (actual: 6, maximum: 5)

I solved this problem with a quick hack for this article (by removing the prefix used in the test data) but a proper fix is now sitting in Dogen's product backlog for implementation in the near future.

Finally, just for giggles, I decided to push the data we read from Oracle into Redis, an in-memory cache that seems to be all the rage amongst the Cool-Kid community. To keep things simple, I used the C API provided by hiredis. Of course, if this was the real world, I would have used one of the many c++ clients for Redis such as redis-cplusplus-client or cpp redis. As it was, I could not find any Debian packages for them, so I'll just have to pretend I know C. Since I'm not much of a C programmer, I decided to do a very bad copy and paste job from this Stack Overflow article. The result was this beauty (forgive me in advance, C programmers):

    redisContext *c;
    redisReply *reply;
    const char *hostname = "localhost";
    int port = 6379;
    struct timeval timeout = { 1, 500000 }; // 1.5 seconds
    c = redisConnectWithTimeout(hostname, port, timeout);
    if (c == NULL || c->err) {
        if (c) {
            std::cerr << "Connection error: " << c->errstr << std::endl;
            redisFree(c);
        } else {
            std::cerr << "Connection error: can't allocate redis context"
                      << std::endl;
        }
        return 1;
    }

    std::ostringstream os;
    boost::archive::binary_oarchive oa(os);
    oa << customers;
    const auto value(os.str());
    const std::string key("customers");
    reply = (redisReply*)redisCommand(c, "SET %b %b", key.c_str(),
        (size_t) key.size(), value.c_str(), (size_t) value.size());
    if (!reply)
        return REDIS_ERR;
    freeReplyObject(reply);

    reply = (redisReply*)redisCommand(c, "GET %b", key.c_str(),
        (size_t) key.size());
    if (!reply)
        return REDIS_ERR;

    if ( reply->type != REDIS_REPLY_STRING ) {
        std::cerr << "ERROR: " << reply->str << std::endl;
        return 1;
    }

    const std::string redis_value(reply->str, reply->len);
    std::istringstream is(redis_value);
    std::list<zango::northwind::customers> customers_from_redis;
    boost::archive::binary_iarchive ia(is);
    ia >> customers_from_redis;
    std::cout << "Read from redis: " << customers_from_redis.size()
              << std::endl;
    std::cout << "Front customer (redis): "
              << customers_from_redis.front() << std::endl;
    freeReplyObject(reply);

And it actually works. Here's the output, with manual formatting of JSON:

Read from redis: 91
Front customer (redis):  {
  "__type__": "zango::northwind::customers",
  "customer_id": {
    "__type__": "zango::northwind::customer_id",
    "value": 1
  },
  "customer_code": "ALFKI",
  "company_name": "Alfreds Futterkiste",
  "contact_name": "Maria Anders",
  "contact_title": "Sales Representative",
  "address": "Obere Str. 57",
  "city": "Berlin",
  "region": "",
  "postal_code": "12209",
  "country": "Germany",
  "phone": "030-0074321",
  "fax": "030-0076545"
}

As you can hopefully see, in very few lines of code we managed to connect to a RDBMS, read some data, push it into a stream, read it and write into Boost Serialization archives and push it into and out of Redis. All this in fairly efficient C++ code (and some very dodgy C code, but we'll keep that one quiet).

A final note on the CMake targets. Zango comes with a couple of targets for Dogen and ODB:

  • knit_northwind generates the Dogen code from the model.
  • odb_northwind runs ODB against the Dogen model, generating the ODB sources.

The ODB target is added automatically by Dogen. The Dogen target was added manually by yours truly, and it is considered good practice to have one such target when you use Dogen so that other Dogen users know how to generate your models. You can, of course, name it what you like, but in the interest of making everyone's life easier its best if you follow the convention.

Oracle and Bulk Fetching

Whilst I was playing around with ODB and Oracle, I noticed a slight problem: there is no bulk fetch support in the ODB Oracle wrappers at present; it works for other scenarios, but not for selects. I reported this to the main ODB mailing list here. By the by, the ODB community is very friendly and their mailing list is a very responsive place to chat about ODB issues.

Anyway, so you can have an idea of this problem, here's a fetch of our generated customers without prefetch support:

<snip>
Generating customers...
Generated customers. Size: 9899
Saving customers...
Saved customers.
Read generated customers. Size: 9990 time (ms): 263.449
<snip>

Remember the 263.449 for a moment. Now say you delete all rows we generated:

delete from  customers where customer_id > 100;

Then, say you apply to libodb-oracle the hastily-hacked patch I mentioned in that mailing list thread. Of course, I am hand-waving here greatly, as you need to rebuild the library, install the binaries, rebuild zango, etc, but you get the gist. At any rate, here's the patch, hard-coding an unscientifically-obtained-prefetch of 5K rows:

--- original_statement.txt 2017-02-09 15:45:56.585765500 +0000
+++ statement.cxx        2017-02-13 10:18:28.447916100 +0000
@@ -1574,18 +1574,29 @@
       OCIError* err (conn_.error_handle ());
+      const int prefetchSize(5000);
+      sword r = OCIAttrSet (stmt_,
+          OCI_HTYPE_STMT,
+          (void*)&prefetchSize,
+          sizeof(int),
+          OCI_ATTR_PREFETCH_ROWS,
+          err);
+
+      if (r == OCI_ERROR || r == OCI_INVALID_HANDLE)
+          translate_error (err, r);
+
       // @@ Retrieve a single row into the already bound output buffers as an
       // optimization? This will avoid multiple server round-trips in the case
       // of a single object load.
       //
-      sword r (OCIStmtExecute (conn_.handle (),
+      r = OCIStmtExecute (conn_.handle (),
                                stmt_,
                                err,
                                0,
                                0,
                                0,
                                0,
-                               OCI_DEFAULT));
+                               OCI_DEFAULT);
       if (r == OCI_ERROR || r == OCI_INVALID_HANDLE)
         translate_error (conn_, r);

And now re-run the command:

Generated customers. Size: 9899
Saving customers...
Saved customers.
Read generated customers. Size: 9990 time (ms): 40.85

Magic! We're down to 40.85. Now that I have a proper setup, I am going to start working on upstreaming this patch, so that ODB can expose the fetch configuration for fetching in a similar manner it already does for other purposes. If you are interested in the gory technical details, have a look at Boris' reply.

Conclusion

Hopefully this concluding part gave you an idea of why you might want to use Dogen with ODB for your modeling needs. Sadly, its not easy to frame the discussion adequately, so that you have all the required context in order to place these two tools in the continuum of tooling; but I'm hoping this series of articles was useful to at least help you setup Oracle Express in Debian and get an idea of what you can do with these two tools.
Created: 2017-03-25 Sat 20:26

Emacs 25.1.1 (Org mode 8.2.10)

Validate

Monday, March 20, 2017

Nerd Food: Northwind, or Using Dogen with ODB - Part III

Nerd Food: Northwind, or Using Dogen with ODB - Part III

Optimism is an occupational hazard of programming; feedback is the treatment. -- Kent Beck

Welcome to the third part of a series of N blog posts on using Dogen with ODB against an Oracle database. If you want more than the TL;DR, please read Part I and Part II. Otherwise, the story so far can be quickly summarised as follows: we got our Oracle Express database installed and set up by adding the required users; we then built the ODB libraries and installed the ODB compiler.

After this rather grand build up, we shall finally get to look at Dogen - just about. It now seems clear these series will have to be extended by at least one or two additional instalments in order to provide a vaguely sensible treatment of the material I had initially planned to cover. I wasn't expecting N to become so large, but - like every good software project - I'm now realising you can only estimate the size of the series properly once you've actually finished it. And to rub salt into the wounds, before we can proceed we must start by addressing some of the instructions in the previous posts which were not quite right.

Est Humanum Errare?

The first and foremost point in the errata agenda is concerned with the additional Oracle packages we downloaded in Part I. When I had originally checked my Oracle XE install, I did not find an include directory, which led me to conclude that a separate download was required for driver libraries and header files. I did find this state of affairs somewhat unusual - but then again, it is Oracle we're talking about here, so "unusual" is the default behaviour. As it turns out, I was wrong; the header files are indeed part of the Oracle XE install, just placed under a rather… shall we say, creative, location: /u01/app/oracle/product/11.2.0/xe/rdbms/public. The libraries are there too, under the slightly more conventionally named lib directory.

This is quite an important find because the downloaded OCI driver has moved on to v12 whereas XE is still on v11. There is backwards compatibility, of course - and everything should work fine connecting a v12 client against an v11 database - but it does introduce an extra layer of complexity: you now need to make sure you do not simultaneously have both v11 and v12 shared objects in the path when linking and running or else you will start to get some strange warnings. As usual, we try our best to confuse only one issue at a time, so we need to make sure we are making use of v11 and purge all references to v12; this entails recompiling ODB's oracle support.

If you followed the instructions on Part II and you have already installed the ODB Oracle library, you'll need to remove it first:

rm /full/path/to/local/lib/libodb-oracle* /full/path/to/local/include/odb/oracle

Remember to replace /full/path/to/local with the path to your local directory. Then, you can build by following the instructions as per previous post, but with one crucial difference at configure time: point to the Oracle XE directories instead of the external OCI driver directories:

. /u01/app/oracle/product/11.2.0/xe/bin/oracle_env.sh
LD_LIBRARY_PATH=/u01/app/oracle/product/11.2.0/xe/lib CPPFLAGS="-I/full/path/to/local/include -I/u01/app/oracle/product/11.2.0/xe/rdbms/public" LDFLAGS="-L/full/path/to/local/lib -L/u01/app/oracle/product/11.2.0/xe/lib" ./configure --prefix=/full/path/to/local

Again, replacing the paths accordingly. If all goes well, the end result should be an ODB Oracle library that uses the OCI driver from Oracle XE. You then just need to make sure you have executed oracle_env.sh before running your binary, but don't worry too much because I'll remind you later on. Whilst we're on the subject of Oracle packages, it's worth mentioning that I did a minor update to Part I: you didn't need to download SQLPlus separately either, as it is also included in XE package. So, in conclusion, after a lot of faffing, it turns out you can get away with just downloading XE and nothing else.

The other minor alteration to what was laid out on the original posts is that I removed the need for the basic database schema. In truth, the entities placed in that schema were not adding a lot of value; their use cases are already covered by the northwind schema, so I removed the need for two schemas and collapsed them into one.

A final note - not quite an errata per se but still, something worthwhile mentioning. We didn't do a "proper" Oracle setup, so when you reboot your box you will find that the service is no longer running. You can easily restart it from the shell, logged in as root:

# cd /etc/init.d/
# ./oracle-xe start
Starting oracle-xe (via systemctl): oracle-xe.service.

Notice that Debian is actually clever enough to integrate the Oracle scripts with systemd, so you can use the usual tools to find out more about this service:

# systemctl status oracle-xe
● oracle-xe.service - SYSV: This is a program that is responsible for taking care of
   Loaded: loaded (/etc/init.d/oracle-xe; generated; vendor preset: enabled)
   Active: active (exited) since Sun 2017-03-12 15:10:47 GMT; 6s ago
     Docs: man:systemd-sysv-generator(8)
  Process: 16761 ExecStart=/etc/init.d/oracle-xe start (code=exited, status=0/SUCCESS)

Mar 12 15:10:37 lorenz systemd[1]: Starting SYSV: This is a program that is responsible for taking c…e of...
Mar 12 15:10:37 lorenz oracle-xe[16761]: Starting Oracle Net Listener.
Mar 12 15:10:37 lorenz su[16772]: Successful su for oracle by root
Mar 12 15:10:37 lorenz su[16772]: + ??? root:oracle
Mar 12 15:10:37 lorenz su[16772]: pam_unix(su:session): session opened for user oracle by (uid=0)
Mar 12 15:10:39 lorenz oracle-xe[16761]: Starting Oracle Database 11g Express Edition instance.
Mar 12 15:10:39 lorenz su[16800]: Successful su for oracle by root
Mar 12 15:10:39 lorenz su[16800]: + ??? root:oracle
Mar 12 15:10:39 lorenz su[16800]: pam_unix(su:session): session opened for user oracle by (uid=0)
Mar 12 15:10:47 lorenz systemd[1]: Started SYSV: This is a program that is responsible for taking care of.
Hint: Some lines were ellipsized, use -l to show in full.

With all of this said, lets resume from where we left off.

Installing the Remaining Packages

We still have a number of packages to install, but fortunately the installation steps are easy enough so we'll cover them quickly in this section. Let's start with Dogen.

Dogen

Installing Dogen is fairly straightforward: we can just grab the latest release from BinTray:

As it happens, we must install v99 or above because we did a number of fixes to Dogen as a result of this series of articles; previous releases had shortcomings with their ODB support.

As expected, the setup is pretty standard-fare debian:

$ wget https://dl.bintray.com/domaindrivenconsulting/Dogen/0.99.0/dogen_0.99.0_amd64-applications.deb -O dogen_0.99.0_amd64-applications.deb
$ sudo dpkg -i dogen_0.99.0_amd64-applications.deb
[sudo] password for USER:
Selecting previously unselected package dogen-applications.
(Reading database ... 551550 files and directories currently installed.)
Preparing to unpack dogen_0.99.0_amd64-applications.deb ...
Unpacking dogen-applications (0.99.0) ...
Setting up dogen-applications (0.99.0) ...

If all has gone according to plan, you should see something along the lines of:

$ dogen.knitter --version
Dogen Knitter v0.99.0
Copyright (C) 2015-2017 Domain Driven Consulting Plc.
Copyright (C) 2012-2015 Marco Craveiro.
License: GPLv3 - GNU GPL version 3 or later <http://gnu.org/licenses/gpl.html>.

Dia

Dogen has multiple frontends - at the time of writing, JSON and Dia. We'll stick with Dia because of its visual nature, but keep in mind that what you can do with Dia you can also do with JSON.

A quick word on Dia for those not in the know, copied verbatim from its home page:

Dia is a GTK+ based diagram creation program for GNU/Linux, MacOS X, Unix, and Windows, and is released under the GPL license.

Dia is roughly inspired by the commercial Windows program 'Visio,' though more geared towards informal diagrams for casual use. It can be used to draw many different kinds of diagrams. It currently has special objects to help draw entity relationship diagrams, UML diagrams, flowcharts, network diagrams, and many other diagrams.

Dia does not change very often, which means any old version will do. You should be able to install dia straight off of package manager:

apt-get install dia

Other Dependencies

I had previously assumed Boost to be installed on Part II but - if nothing else, purely for the sake of completeness - here are the instructions to set it up, as well as CMake and Ninja. We will need these in order to build our application, but we won't dwell on them too much on them or else this series of posts would go on forever. Pretty much any recent version of Boost and CMake will do, so again we'll just stick to vanilla package manager:

# apt-get install cmake ninja-build libboost-all-dev

Mind you, you don't actually need the entirety of Boost for this exercise, but it's just easier this way.

Emacs and SQL Plus

Finally, a couple of lose notes which I might as well add here. If you wish to use SQLPlus from within Emacs - and you should, since the SQLi mode is just simply glorious - you can configure it to use our Oracle Express database quite easily:

(add-to-list 'exec-path "/u01/app/oracle/product/11.2.0/xe/bin")
(setenv "PATH" (concat (getenv "PATH") ":/u01/app/oracle/product/11.2.0/xe/bin"))
(setenv "ORACLE_HOME" "/u01/app/oracle/product/11.2.0/xe")

After this you will be able to start SQL Plus from Emacs with the usual sql-oracle command. I recommend you to do at least a minimal setup of SQL Plus too, to make it usable:

SQL> set linesize 8192
SQL> set pagesize 50000

Introducing Zango

After this excruciatingly long setup process, we can at long last start to create our very "simple" project. Simple in quotes because it ended up being a tad more complex than what was originally envisioned, so it was easier to create a GitHub repository for it. It would have been preferable to describe it from first principles, but then the commentary would literally go on for ever. A compromise had to be made.

In order to follow the remainder of this post please clone zango from GitHub:

git clone git@github.com:DomainDrivenConsulting/zango.git

Zango is a very small Dogen project that builds with CMake. Here are some notes on the folder structure to help you navigate:

  • build/cmake: additional CMake modules that are not part of the standard CMake distribution. We need this for ODB, Oracle and Dogen.
  • data: some application data that we will use to populate our database.
  • projects: where all the code lives.
  • projects/input_models: location of the Dogen models - in this case, we just have one. You could, of course, place it anywhere you'd like, but traditionally this is where they live.
  • projects/northwind: code output of the Dogen model. This is the key project of zango.
  • projects/application: our little command line driver for the application.

Now, before we get to look at the code I'd like to first talk about Northwind and on the relationship between Dogen and ODB.

Northwind Schema

Microsoft makes the venerable Northwind database available in CodePlex, at this location. I found a useful description of the Northwind database here, which I quote:

Northwind Traders Access database is a sample database that shipped with Microsoft Office suite. The Northwind database contains the sales data for a fictitious company called Northwind Traders, which imports and exports specialty foods from around the world. You can use and experiment with Access with Northwind database while you're learning and develop ideas for Access.

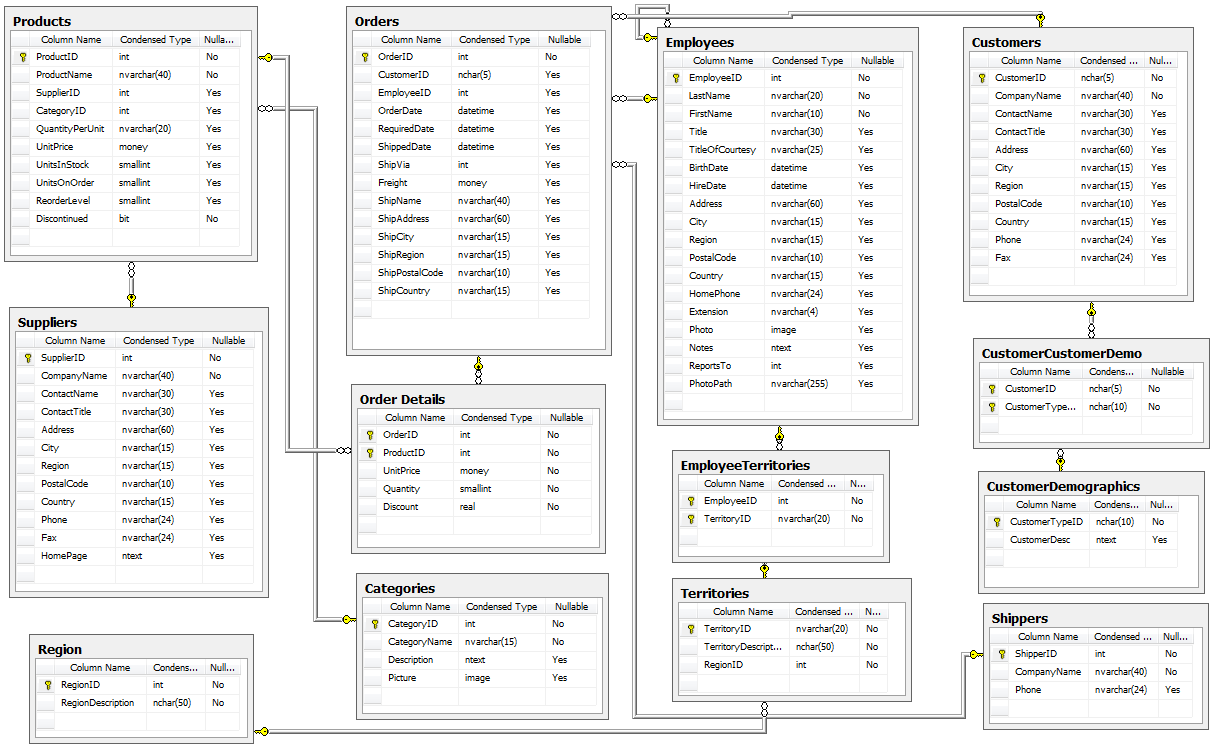
If you really want a thorough introduction to Northwind, you could do worse than reading this paper: Adapting the Access Northwind Database to Support a Database Course. Having said that, for the purposes of this series we don't really need to dig that deep. In fact, I'll just present CodePlex's diagram with the tables and their relationships to give you an idea of the schema - without any further commentary - and that's more or less all that needs to be said about it:

Northwind Schema (C) Microsoft.

Now, in theory, we could use this image to manually extract all the required information to create a Dia diagram that follows Dogen's conventions, code-generate that and Bob's your Uncle. However, in practice we have a problem: the CodePlex project only contains the SQL statements for Microsoft SQL Server. Part of the point of this exercise is to show that we can load real data from Oracle, rather than just generate random data, so it would be nice to load up the "real" Northwind data from their own tables. This would be more of an "end-to-end" test, as opposed to using ODB to generate the tables, and Dogen to generate random data which we can push to the database.

However, its not entirely trivial to convert T-SQL into Oracle SQL, and since this is supposed to be a "quick" project on the side - focusing on ODB and Dogen - I was keen on not spending time on unrelated activities such as SQL conversions. Fortunately, I found exactly what I was looking for: a series of posts from GeeksEngine entitled "Convert MS Access Northwind database to Oracle". For reference, these are as follows:

If you don't care too much about the details, you can just look at the Oracle SQL statements, available here and copied across into the Zango project. I guess it's still worthwhile mentioning that GeeksEngine has reduced considerably the number of entities in the schema - for which they provide a rationale. Before we start an in-depth discussions into the merits of normalisation and de-normalisation and other DBA level topics, I have to stop you in your tracks. Please do not get too hung-up on the "quality" of the database schema of Northwind - either the Microsoft or the GeeksEngine one. The purpose of this exercise is merely to demonstrate how Dogen and ODB work together to provide an ORM solution. From this perspective, any vaguely realistic database schema is adequate - provided it allows us to test-drive all the features we're interested in. Whether you agree or not with the decisions the original creators of this schema made is a completely different matter, which is well beyond the scope of this series of posts.

Right, so now we need to setup our Northwind schema and populate it with data. For this you can open a SQL Plus session with user Northwind as explained previously and then run in the SQL script:

@/path/to/zango/data/Oracle-Northwind.sql

Replacing /path/to with the full path to your Zango checkout. This executes the GeeksEngine script against your local Oracle XE database. If all has gone well, you should now have a whole load of tables and data. You can sanity-check the setup by running the following SQL:

SQL> select table_name from all_tables where owner = 'NORTHWIND';

TABLE_NAME
------------------------------
ORDER_DETAILS
CATEGORIES
CUSTOMERS
EMPLOYEES
SUPPLIERS
SHIPPERS
PRODUCTS
ORDERS

8 rows selected.

SQL> select employee_id, firstname, lastname from employees where rownum <3;

EMPLOYEE_ID FIRSTNAME  LASTNAME
----------- ---------- --------------------
      1 Nancy      Davolio
      2 Andrew     Fuller

Now then, let's model these entities in Dogen.

The Dogen Model for Northwind

Before we proceed, I'm afraid I must make yet another disclaimer: a proper explanation on how to use Dia (and UML in general) is outside the scope of these articles, so you'll see me hand-waving quite a lot. Hopefully the diagrams are sufficiently self-explanatory for you to get the idea.

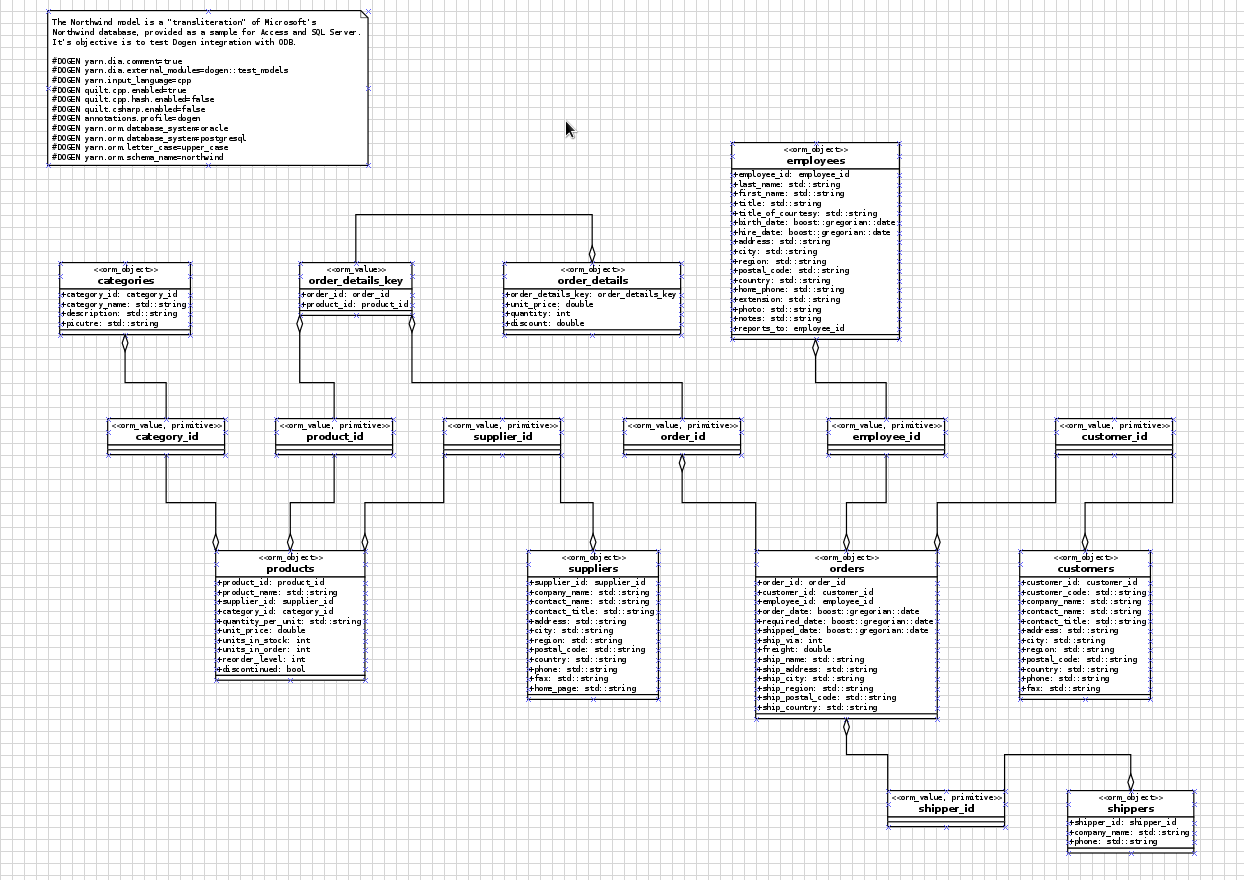
The process of modeling is simply to take the entities of the GeeksEngine SQL schema and to model them in Dia, following Dogen's conventions: each SQL type is converted to what we deemed to be the closest C++ type. You can open the diagram from the folder projects/input_models/northwind.dia, but if you haven't got it handy, here's a screenshot of most of the UML model:

Dogen Northwind model.

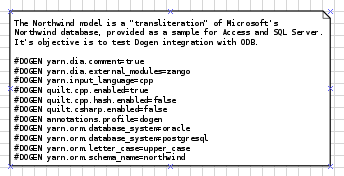
The first point of note in that diagram is - if you pardon the pun - the UML note.

odb_uml_note.png

Figure 1: UML Note from northwind model.

This configuration is quite important so we'll discuss it a bit more detail. All lines starting with #DOGEN are an extension mechanism used to supply meta-data into Dogen. First, lets have a very quick look at the model's more "general settings":

  • yarn.dia.comment: this is a special command that tells Dogen to use this UML note as the source code comments for the namespace of the model (i.e. northwind). Thus the text "The Northwind model is a…" will become part of a doxygen comment for the namespace.
  • yarn.dia.external_modules: this places all types into the top-level namespace northwind.
  • yarn.input_language: the notation for types used in this model is C++. We won't delve on this too much, but just keep in mind that Dogen supports both C++ and C#.
  • quilt.cpp.enabled: as we are using C++, we must enable it.
  • quilt.cpp.hash.enabled: we not require this feature for the purposes of this exercise.
  • quilt.csharp.enabled: As this is a C++-only model, we will disable C#.
  • annotations.profile: Do not worry too much about this knob, it just sets a lot of default options for this project such as copyright notices and so forth.

As promised, you won't fail to notice we hand-waved quite a lot on the description of these settings. It is very difficult to explain them properly them without giving the reader an immense amount of context about Dogen. This, of course, needs to be done - particularly since we haven't really spent the required time updating the manual. However, in the interest of keeping this series of posts somewhat focused on ODB and ORM, we'll just leave it at that, with a promise to create Dogen-specific posts on them.

Talking about ORM, the next batch of settings is exactly related to that.

  • yarn.orm.database_system: here, we're stating that we're interested in both oracle and postgresql databases.
  • yarn.orm.letter_case: this sets the "case" to use for all identifiers; either upper_case or lower_case. So if you choose upper_case, all your table names will be in upper case and vice-versa. This applies to all columns and object names on the entirety of this model (e.g. customers becomes CUSTOMERS and so forth).
  • yarn.orm.schema_name: finally we set the schema name to northwind. Remember that we are in upper case, so the name becomes NORTHWIND.

In addition to the meta-data, the second point worth noticing is that there is a large overlap between C++ classes and the entities in the original diagram. For example, we have customers, suppliers, employees and so forth - the Object-Relational Mapping is very "linear". This is a characteristic of the Dogen approach to ORM, but you do not necessarily need to use ODB in this manner; we discuss this in the next section.

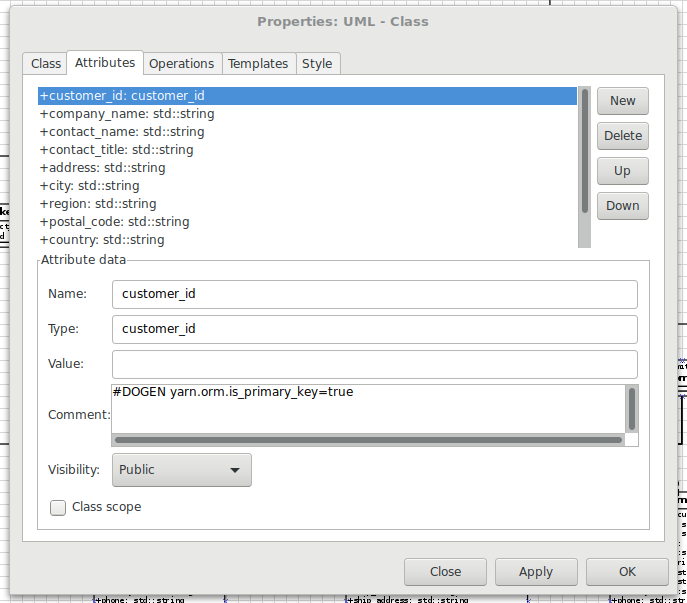
If one is to look at a properties of a few attributes in more detail, one can see additional Dogen meta-data. Take customer_id in the customers class:

odb_customer_id_attributes.png

Figure 2: Properties of customerid in the customer class.

The setting yarn.orm.is_primary_key tells Dogen that this attribute is the primary key of the table. Note that we did not use an int as the type of customer_id but instead made use of a Dogen feature called "primitives". Primitives are simple wrappers around builtins and "core" types such as std::string, intended to have little or no overhead after the compiler is done with them. They are useful when you want to use domain concepts to clarify intent. For example, primitives help making it obvious when you try to use a customer_id when a supplier_id was called for. It's also worth noticing that customer_id makes use of yarn.orm.is_nullable - settable to true or false. It results in Dogen telling ODB if a column can be NULL or not.

As we stated, each of the attributes of these classes has the closest C++ type we could find that maps to the SQL type used in the database schema. Of course, different developers can make different choices for these types. For example, were we to store the picture data rather than a path to the picture as GeeksEngine decided to do, we would use a std::vector<char> instead of a std::string. In that case, we'd have to perform some additional mapping too:

#DOGEN yarn.orm.type_override=postgresql,BYTEA
#DOGEN yarn.orm.type_override=oracle,BLOB

This tells Dogen about the mapping of the attribute's type to the SQL type. Dogen then conveys this information to ODB.

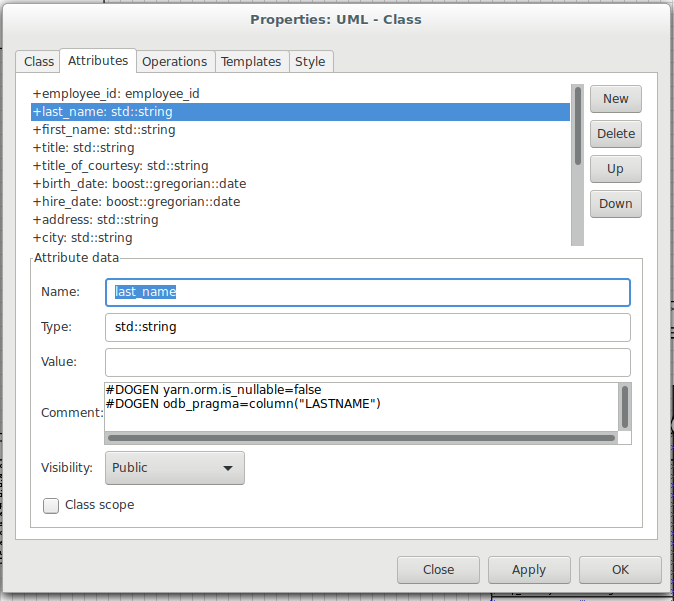
Dogen's ORM support is still quite young - literally a couple of sprints old - so there will be cases where you may need to perform some customisation which is not yet available in its meta-model. In these cases, you can bypass Dogen and make use of ODB pragmas directly. As an example, GeeksEngine Oracle schema named a few columns in Employees without underscores such as FIRSTNAME and LASTNAME. We want the C++ classes to have the correct names (e.g. first_name, last_name, etc) so we simply tell ODB that these columns have different names in the database. Take last name for example:

odb_last_name_attributes.png

Figure 3: Properties of last name in the employee class.

A final note on composite keys. Predictably, Dogen follows the ODB approach - in that primary keys that have more than one column must be expressed as a class on its own right. In northwind, we use the postfix _key for these class names in order to make them easier to identify - e.g. order_details_key. You won't fail to notice that this class has the flag yarn.orm.is_value set. It tells Dogen - and, by extension, ODB - that it is not really a full-blown type, which would map it to a table, but instead should be treated like other value types such as std::string.

Interlude: Dogen with ODB vs Plain ODB

"The technical minutiae is all well and good", the inquisitive reader will say, "but why Dogen and ODB? Why add yet another layer of indirection when one can just use ODB?" Indeed, it may be puzzling for there to be a need for a code-generator which generates code for another code-generator. "Turtles all the way down" and "We over-engineered it yet again", the crowd chants from the terraces.

Let me attempt to address some of these concerns.

First, it is important to understand the argument we're trying to make here: Dogen models benefit greatly from ODB, but its not necessarily the case that all ODB users benefit from Dogen. Let's start with a classic ODB use case, which is to take an existing code base and add ORM support to it. In this scenario it makes no sense to introduce Dogen; after all, ODB requires only small changes to the original source code and has the ability to parse very complex C++. And, of course, using ODB in this manner also allows one to deal with impedance mismatches between the relational model and the object model of your domain.

Dogen, on the other hand, exists mainly to support Model Driven Software Development (MDSD), so the modeling process is the driver. This means that one is expected to start with a Dogen model, and to use the traditional MDSD techniques for the management of the life-cycle of your model - and eventually for the generation of entire software product lines. Of course, you need not buy into the whole MDSD sales pitch in order to make use of Dogen, but you should at least understand it in this context. At a bare minimum, it requires you to think in terms of Domain Models - as Domain Driven Development defines them - and then in terms of "classes of features" required by the elements of your domain. These we call "facets" in Dogen parlance. There are many such facets like io, which is the ability to dump an object's state into a C++ stream - at present using JSON notation - or serialization which is the ability to serialise an object using Boost serialisation. It is in this context that ODB enters the Dogen world. We could, of course, generate ORM mappings (and SQL) directly from Dogen. But given what we've seen from ODB, it seems this would be a very large project - or, conversely, we'd have very poor support, not dealing with a great number of corner cases. By generating the very minimal and very non-intrusive code that ODB needs, we benefit from the years of experience accumulated in this tool whilst at the same time making life easier for Dogen users.

Of course, as with all engineering trade-offs, this one is not without its disadvantages. When things do go wrong you now have more moving parts to go through when root-causing: was it an error in the diagram, or was it Dogen, or was it the mapping between Dogen and ODB or was it ODB? Fortunately, I found that this situation is minimised by the way in which you end up using Dogen. For instance, all generated code can be version-controlled, so you can look at the ODB input files generated by Dogen and observe how they change with changes in the Dogen model. The Dogen ODB files should also look very much like regular hand-crafted ODB files - making use of pragmas and so forth - and you are also required to run ODB manually against them. Thus, in practice, I have found troubleshooting straightforward enough that the layers of indirection end up not constituting a real problem.

Finally, its worth pointing out that the Domain Models Dogen generates have a fairly straightforward shape to them, making the ODB mapping a lot more trivial that "general" C++ code would have. It is because of this that we have orm parameters in Dogen, which can expand to multiple ODB pragmas - the user should not need to worry about that expansion.

Conclusion

This part is already becoming quite large, so I'm afraid we need to stop it here and continue on Part IV. However, we have managed to address a few of the mistakes of the Oracle setup of previous parts, introduced the remaining applications that we need to install and then discussed Northwind - both in terms of its original intent and also in terms of the Dogen objectives. Finally we provided an explanation of how Dogen and ODB fit together in a tooling ecosystem.

Created: 2017-03-19 Sun 23:07

Emacs 25.1.1 (Org mode 8.2.10)

Validate

Friday, February 24, 2017

Nerd Food: Northwind, or Using Dogen with ODB - Part II

Nerd Food: Northwind, or Using Dogen with ODB - Part II

On Part I of this series, we got our Oracle Express database up and running against Debian Testing. It involved quite a bit of fiddling but we seemed to get there in the end. In Part II we shall now finish the configuration of the Oracle database and set up the application dependencies. On Part III we will finally get to the Dogen model, and start to make use of ODB.

What's in a Schema?

The first thing we need to do to our database is add the "application users". This is a common approach to most server side apps, where we tend to have "service users" that login to the database and act upon user requests on their behalf. We can then use audit tables to stamp the user actions so we can monitor them. We can also have application level permissions that stop users from doing silly things. This is of course a step up from the applications in the nineties, where one would have one database account for each user - allowing all sorts of weird and wonderful things such as users connecting directly to databases via ODBC and Excel or Access. I guess nowadays developers don't even know someone thought this to be a good idea at one point.

When I say "database user", most developers exposed to RDBMS' immediately associate this to a user account. This is of course how most databases work, but obviously not so with Oracle. In Oracle, "users" and "schemas" are conflated, so much so it's hard to tell if there is any difference between them. For the purist RDBMS user, a schema is a schema - a collection of tables and other database objects, effectively a namespace - and a user is a user - a person (real or otherwise) that owns database objects. In Oracle these two more or less map to the same concept. So when you create a user, you have created a schema and you can start adding tables to it; and when you refer to database objects, you prefix them by the user name just as you would if they belonged to a schema. And, of course, you can have users that have no database objects for themselves, but which were granted permission to access database objects from other users.

So our first task is to create two schemas; these are required by the Dogen model which we will use as our "application". They are:

  • basic
  • northwind

As I mentioned before, I had created some fairly basic tests for ODB support in Dogen. Those entities were placed in the aptly named schema basic. I then decided to extend the schema with something a bit more meaty, which is where northwind comes in.

For the oldest readers, especially those with a Microsoft background, Northwind is bound to conjure memories. Many of us learned Microsoft Access at some point in the nineties, and in those days the samples were pure gold. I was lucky enough to learn about relational databases in my high-school days, using Clipper and dBASE IV, so the transition to Microsoft Access was more of an exercise in mapping than learning proper. And that's where Northwind came in. It was a "large" database, with forms and queries and tables and all sorts of weird and wonderful things; every time you needed something done to your database you'd check first to see how Northwind had done it.

Now that we are much older, of course, we can see the flaws of Northwind and even call for its abolition. But you must remember that in the nineties there was no Internet for most of us - even dial-up was pretty rare where I was - and up-to-date IT books were almost as scarce, so samples were like gold dust. So for all of these historic reasons and as an homage to my olden days, I decided to implement the Northwind schema in Dogen and ODB; it may not cover all corner cases, but it is certainly a step up on my previous basic tests.

Enough about history and motivations. Returning to our SQLPlus from Part I, where we were logged in as SYSTEM, we start first by creating a table space and then the users which will make use of that table space:

SQL> create tablespace tbs_01 datafile 'tbs_f01.dbf' size 200M online;

Tablespace created.

SQL> create user basic identified by "PASSWORD" default tablespace tbs_01 quota 100M on tbs_01;
User created.

SQL> create user northwind identified by "PASSWORD" default tablespace tbs_01 quota 100M on tbs_01;

User created.

Remember to replace PASSWORD with your own passwords. This is of course a very simple setup; in the real world you would have to take great care setting the users and table spaces up, including thinking about temporary table spaces and so forth. But for our simplistic purposes this suffices. Now we need to grant these users a couple of useful privileges - again, for a real setup, you'd need quite a bit more:

SQL> GRANT create session TO basic;
GRANT create session TO basic;

Grant succeeded.

SQL> GRANT create table TO basic;
GRANT create table TO basic;

Grant succeeded.

SQL> GRANT create session TO northwind;
GRANT create session TO northwind;

Grant succeeded.

SQL> GRANT create table TO northwind;
GRANT create table TO northwind;

Grant succeeded.

If all went well, we should now be able to exit the SYSTEM session, start a new one with one of these users, and play with a test table:

$ sqlplus northwind@XE

SQL*Plus: Release 11.2.0.2.0 Production on Fri Feb 24 10:20:10 2017

Copyright (c) 1982, 2011, Oracle.  All rights reserved.

Enter password:

Connected to:
Oracle Database 11g Express Edition Release 11.2.0.2.0 - 64bit Production

SQL> create table test ( name varchar(10) );

Table created.

SQL> insert into test(name) values ('kianda');
insert into test(name) values ('kianda');

1 row created.

SQL> select * from test;

NAME
----------
kianda

SQL> grant select on test to basic;

Grant succeeded.

SQL> Disconnected from Oracle Database 11g Express Edition Release 11.2.0.2.0 - 64bit Production
$ sqlplus basic@XE

SQL*Plus: Release 11.2.0.2.0 Production on Fri Feb 24 10:23:04 2017

Copyright (c) 1982, 2011, Oracle.  All rights reserved.

Enter password:

Connected to:
Oracle Database 11g Express Edition Release 11.2.0.2.0 - 64bit Production

SQL> select * from northwind.test;

NAME
----------
kianda

This all looks quite promising. To recap, we logged in with user northwind, created a table, inserted some random data and selected it back; all looked ok. Then for good measure, we granted the rights to see this test table to user basic; logged in as that user and selected the test table, with the expected results.

At this point we consider our Oracle setup completed and we're ready to enter the application world.

Enter ODB

Setting up ODB is fairly easy, especially if you are on Debian: you can simply obtain it from apt-get or synaptic. The only slight snag is, I could not find the oracle dependencies (i.e. libodb-oracle). Likely this is because they depend on OCI, which is non-free, so Debian either does not bother to package it at all or you need some kind of special (non-free) repo for it. As it was, instead of losing myself on wild goose chases, I thought easier to build from source. And since I had to build one from source, might as well build all (or almost all) to demonstrate the whole process from scratch as it is pretty straightforward, really.

Before we proceed, one warning: best if you either use your package manager or build from source. You should probably only mix-and-match if you really know what you are doing; if you do and things get tangled up, it may take you a long while to figure out the source of your woes.

So, the manual approach. I first started by revisiting my previous notes on building ODB; as it happens, I had covered installing ODB from source previously here for version 2.2. However, those instructions have largely bit-rotted at the Dogen end and things have changed slightly since that post, so a revisit is worthwhile.

As usual, we start by grabbing all of the packages from the main ODB website:

  • odb 2.4.0-1 amd64.deb: the ODB compiler itself.
  • libodb-2.4.0: the main ODB library, required by all backends.
  • libodb-pgsql-2.4.0: the PostgreSQL backend. We don't need it today, of course, but since PostgreSQL is my DB of choice I always install it.
  • libodb-oracle-2.4.0: the Oracle backend. We will need this one.
  • libodb-boost-2.4.0: the ODB boost profile. This allows using boost types in your Dogen model and having ODB do the right thing in terms of ORM mapping. Our Northwind model does not use boost at present, but I intend to change it as soon as possible as this is a very important feature for customers.

Of course, if you are too lazy to click on buttons, just use wget:

$ mkdir odb
$ cd odb
$ wget http://www.codesynthesis.com/download/odb/2.4/odb_2.4.0-1_amd64.deb -O odb_2.4.0-1_amd64.deb
$ wget http://www.codesynthesis.com/download/odb/2.4/libodb-2.4.0.tar.gz -O libodb-2.4.0.tar.gz
$ wget http://www.codesynthesis.com/download/odb/2.4/libodb-pgsql-2.4.0.tar.gz -O libodb-pgsql-2.4.0.tar.gz
$ wget http://www.codesynthesis.com/download/odb/2.4/libodb-oracle-2.4.0.tar.gz -O libodb-oracle-2.4.0.tar.gz
$ wget http://www.codesynthesis.com/download/odb/2.4/libodb-boost-2.4.0.tar.gz -O libodb-boost-2.4.0.tar.gz

We start with the DEB, as simple as always:

# dpkg -i odb_2.4.0-1_amd64.deb
Selecting previously unselected package odb.
(Reading database ... 549841 files and directories currently installed.)
Preparing to unpack odb_2.4.0-1_amd64.deb ...
Unpacking odb (2.4.0-1) ...
Setting up odb (2.4.0-1) ...
Processing triggers for man-db (2.7.6.1-2) ...

I tend to store locally built software under my home directory, so that's where we'll place the libraries:

$ mkdir ~/local
$ tar -xaf libodb-2.4.0.tar.gz
$ cd libodb-2.4.0/
$ ./configure --prefix=/full/path/to/local
<snip>
make[1]: Leaving directory '/path/to/build/directory/odb/2.4/libodb-2.4.0'
$ make install
<snip>
make[1]: Leaving directory '/path/to/build/directory/odb/2.4/libodb-2.4.0'

Remember to replace /full/path/to/local with your installation directory. The process is similar for the other three packages, with one crucial difference: you need to ensure the environment variables are set to place all required dependencies in the include and link path. This is achieved via the venerable environment variables CPPFLAGS and LDFLAGS (and LD_LIBRARY_PATH as we shall see). You may bump into --with-libodb. However, be careful; the documentation states:

If these libraries are not installed and you would like to use their build directories instead, you can use the --with-libodb, and --with-boost configure options to specify their locations, for example:

./configure --with-boost=/tmp/boost

So if you did make install, you need the environment variables instead.

Without further ado, here are the shell commands. First boost; do note I am relying on the presence of Debian's system boost; if you have a local build of boost, which is not in the flags below, you will also need to add a path to it.

$ cd ..
$ tar -xaf libodb-boost-2.4.0.tar.gz
$ cd libodb-boost-2.4.0/
$ CPPFLAGS=-I/full/path/to/local/include LDFLAGS=-L/full/path/to/local/lib ./configure --prefix=/full/path/to/local
<snip>
config.status: executing libtool-rpath-patch commands
$ make -j5
<snip>
make[1]: Leaving directory '/path/to/build/directory/odb/2.4/libodb-boost-2.4.0'
$ make install
make[1]: Leaving directory '/path/to/build/directory/odb/2.4/libodb-boost-2.4.0'

For PostgreSQL again I am relying on the header files installed in Debian. The commands are:

$ cd ..
$ tar -xaf libodb-pgsql-2.4.0.tar.gz
$ cd libodb-pgsql-2.4.0/
$ CPPFLAGS=-I/full/path/to/local/include LDFLAGS=-L/full/path/to/local/lib ./configure --prefix=/full/path/to/local
<snip>
config.status: executing libtool-rpath-patch commands
$ make -j5
<snip>
make[1]: Leaving directory '/path/to/build/directory/odb/2.4/libodb-pgsql-2.4.0'
$ make install
<snip>
make[1]: Leaving directory '/path/to/build/directory/odb/2.4/libodb-pgsql-2.4.0'

Finally, Oracle. For this we need to supply the locations of the downloaded drivers or else ODB will not find the Oracle header and libraries. If you recall from the previous post, they are located in /usr/include/oracle/12.1/client64 and /usr/lib/oracle/12.1/client64/lib, so we must augment the flags with those two paths. In addition, I found configure was failing with errors finding shared objects, so I added LD_LIBRARY_PATH for good measure. The end result was as follows:

$ cd ..
$ tar -xaf libodb-oracle-2.4.0.tar.gz
$ cd libodb-oracle-2.4.0
$ LD_LIBRARY_PATH=/usr/lib/oracle/12.1/client64/lib CPPFLAGS="-I/full/path/to/local/include -I/usr/include/oracle/12.1/client64" LDFLAGS="-L/full/path/to/local/lib -L/usr/lib/oracle/12.1/client64/lib" ./configure --prefix=/full/path/to/local
<snip>
config.status: executing libtool-rpath-patch commands
$ make -j5
<snip>
make[1]: Leaving directory '/path/to/build/directory/odb/2.4/libodb-oracle-2.4.0'
$ make install
<snip>
make[1]: Leaving directory '/path/to/build/directory/odb/2.4/libodb-oracle-2.4.0'

And there you are; all libraries built and installed into our local directory, ready to be used.

Conclusion

In this part we've configured the Oracle Express database with the application users, and we sanity checked the configuration. Once that was out of the way, we built and installed all of the ODB libraries required by application code.

On Part III we will finally start making use of this setup and attempt to connect to the Oracle database. Stay tuned!

Created: 2017-02-24 Fri 12:32

Emacs 25.1.1 (Org mode 8.2.10)

Validate

Thursday, February 23, 2017

Nerd Food: Northwind, or Using Dogen with ODB - Part I

Nerd Food: Northwind, or Using Dogen with ODB - Part I

Thanks to my first Dogen paying customer, I finally got a chance to work with ODB - Code Synthesis' amazingly interesting C++ Object-Relational Mapping tool, built on the back of the GCC plugin system. I've personally always been in awe of what Boris Kolpackov has achieved, and, of course, it being a South African company made me all the more keen to use their wares. More importantly: the product just seems to rock in terms of polish, features and documentation.

Astute readers of this blog will point out that Dogen has been supporting ODB for quite some time. That is indeed true, but since I haven't used this feature in anger, I wasn't sure how good the support really was; our fairly trivial database model (Dia) explored only a small fraction of what is possible. Now that I finally had a chance to use it in production, I needed to expand the tests and try to replicate the customer's scenario as close as possible. As always in these situations, there was a snag: instead of using PostgreSQL - the RDBMS I had originally used in my Dogen tests - they were using Oracle. So my first task was to setup Oracle locally on my beloved Debian Linux.

Never one to miss an opportunity, I decided this adventure was worthy of a quick blog post; it soon turned out to be a series of posts, if I was to do any justice to this strange and wild experiment, through all of its twists and turns. But hopefully it is worth the effort, as it also demonstrates what you can do with Dogen and ODB. And so, here we are.

The first part of the series deals with just trying to convince Oracle to run on Debian Testing - something that obviously Oracle does not support out of the box.

Before we proceed, a word to the wise: this is a highly experimental Oracle setup, which I embarked upon just because I could; follow it at your own peril, and do not use it anywhere near production. More generally, if you want to stick to the beaten track, use Oracle on RHEL, CentOS or - god forbid - even Windows. All of that said, if like me, you are a Debian person, well, there's not much for it other than to fire off a VM and start looking for those damned faint tracks in the jungle.

Alien Worlds

The very first stumbling block was Oracle itself. After all, for all the many years of using this RBDMS at work - more than I care to admit in polite company - I suddenly realised I actually never used it at home. Or course, Oracle has supported Linux for a little while now; and the good news is they have a "free" version available: Oracle Database Express Edition (XE). A quick glance at the Oracle website revealed RPM's for 64-bits (Intel only, of course). So before anything else, I decided to brush up my knowledge of Alien.

Alien is a debian package that converts RPMs into DEBs. I've used it in the past for another (lovely) Oracle technology: Java. It had worked wonderfully well then so I thought I'd give it a try. The Ubuntu Alien HowTo is pretty straightforward, and so is Debian's. Basically, obtain Alien:

sudo apt-get install alien

And then apply it to the RPM in question. So the next quest was obtaining those darn RPMs.

Of course, once you move away from the easy world of Free and Open Source Software, things start to get a bit more complicated. Those lovely links you can easy Google for don't actually work until you sign up for an Oracle developer account, asking all sorts of personal information. Sadly, even listening to Tesla earnings conferences requires registering these days. Undaunted, I filled all required fields, obtained my developer account and returned to download my loot. For Oracle Express it's rather straightforward: there is a grand-total of one package for Linux 64-bit, so you can't really go wrong. Here's the link, just in case:

  • Oracle Express: download the 64-bit Linux RPM oracle-xe-11.2.0-1.0.x86_64.rpm.zip.

It is interesting that they decided to zip the RPM but you can easily unzip it with the unzip tool. The contents are the RPM Alien expects, plus a few oracle specific files which I decided to ignore for now:

$ unzip oracle-xe-11.2.0-1.0.x86_64.rpm.zip
Archive:  oracle-xe-11.2.0-1.0.x86_64.rpm.zip
   creating: Disk1/
   creating: Disk1/upgrade/
  inflating: Disk1/upgrade/gen_inst.sql
   creating: Disk1/response/
  inflating: Disk1/response/xe.rsp
  inflating: Disk1/oracle-xe-11.2.0-1.0.x86_64.rpm

From a quick glance at the instructions, it appeared the Oracle Express package contained just the database server - that meant it did not include a command line client, or the APIs to build applications that talk to the database. To be fair, this is not an entirely uncommon approach; Debian also packages the PostgreSQL server separately from the development libraries. But behind apt-get and synaptic, installation of packages is all so trivial. Not so when you have to go through lots of detailed explanations of different packages and variations. But; onwards! In the Instant client page, I settled on the downloading the following:

  • Basic: client shared libraries. Package: oracle-instantclient12.1-basic-12.1.0.2.0-1.x86_64.rpm
  • SQL Plus: command-line client. Package: oracle-instantclient12.1-sqlplus-12.1.0.2.0-1.x86_64.rpm
  • SDK: header files to compile code. Package: oracle-instantclient12.1-devel-12.1.0.2.0-1.x86_64.rpm

Update: As it turns out, I was wrong on my original expectations, and you don't really need the SQL Plus package - its already included with Oracle Express. But I only figured it out much later, so I'll leave the steps as I originally followed them.

With all of these packages in hand, I swiftly got busy with Alien, only to also rather swiftly hit an issue:

$ cd Disk1
$ alien --scripts oracle-xe-11.2.0-1.0.x86_64.rpm
Must run as root to convert to deb format (or you may use fakeroot).

Yes, sadly you cannot run alien directly as an unprivileged user. I did not wish to start reading up on FakeRoot - seems straightforward enough, to be fair, but hey - so I took the easy way out and ran all the Alien commands as root. Note also the --scripts to ensure the scripts will also get converted across. This will bring us some other… interesting issues, shall we say, but seems worthwhile doing.

Quite a few seconds later (hey, it was a 300 MB RPM!), a nice looking DEB was generated:

# alien --scripts oracle-xe-11.2.0-1.0.x86_64.rpm
oracle-xe_11.2.0-2_amd64.deb generated

A rather promising start. For good measure, I repeated the process with all RPMs, all with similar results:

# alien oracle-instantclient12.1-basic_12.1.0.2.0-2_amd64.deb
oracle-instantclient12.1-basic_12.1.0.2.0-2_amd64.deb generated

# alien oracle-instantclient12.1-sqlplus-12.1.0.2.0-1.x86_64.rpm
oracle-instantclient12.1-sqlplus_12.1.0.2.0-2_amd64.deb generated

# alien  oracle-instantclient12.1-devel-12.1.0.2.0-1.x86_64.rpm
oracle-instantclient12.1-devel_12.1.0.2.0-2_amd64.deb generated

Voila, all DEBs generated. Of course, as the English love to say, the proof is in the pudding - whatever that means, exactly. So before one can celebrate, you should try to install the generated packages. That can be easily done with our old trusty dpkg:

# dpkg -i oracle-xe_11.2.0-2_amd64.deb
Selecting previously unselected package oracle-xe.
(Reading database ... 564824 files and directories currently installed.)
Preparing to unpack oracle-xe_11.2.0-2_amd64.deb ...
Unpacking oracle-xe (11.2.0-2) ...
Setting up oracle-xe (11.2.0-2) ...
Executing post-install steps...
/var/lib/dpkg/info/oracle-xe.postinst: line 114: /sbin/chkconfig: No such file or directory
You must run '/etc/init.d/oracle-xe configure' as the root user to configure the database.

Processing triggers for libc-bin (2.24-8) ...
Processing triggers for systemd (232-8) ...
Processing triggers for desktop-file-utils (0.23-1) ...
Processing triggers for gnome-menus (3.13.3-8) ...
Processing triggers for mime-support (3.60) ...

As it turns out, it seems the error for chkconfig is related to setting up the service to autostart. Since this was not a key requirement for my purposes, I decided to ignore it. The remaining RPMs - or should I say DEBs - installed beautifully:

# dpkg -i oracle-instantclient12.1-basic_12.1.0.2.0-2_amd64.deb
Selecting previously unselected package oracle-instantclient12.1-basic.
(Reading database ... 564801 files and directories currently installed.)
Preparing to unpack oracle-instantclient12.1-basic_12.1.0.2.0-2_amd64.deb ...
Unpacking oracle-instantclient12.1-basic (12.1.0.2.0-2) ...
Setting up oracle-instantclient12.1-basic (12.1.0.2.0-2) ...
Processing triggers for libc-bin (2.24-8) ...
# dpkg -i oracle-instantclient12.1-sqlplus_12.1.0.2.0-2_amd64.deb
Selecting previously unselected package oracle-instantclient12.1-sqlplus.
(Reading database ... 567895 files and directories currently installed.)
Preparing to unpack oracle-instantclient12.1-sqlplus_12.1.0.2.0-2_amd64.deb ...
Unpacking oracle-instantclient12.1-sqlplus (12.1.0.2.0-2) ...
Setting up oracle-instantclient12.1-sqlplus (12.1.0.2.0-2) ...
# dpkg -i oracle-instantclient12.1-devel_12.1.0.2.0-2_amd64.deb
Selecting previously unselected package oracle-instantclient12.1-devel.
(Reading database ... 567903 files and directories currently installed.)
Preparing to unpack oracle-instantclient12.1-devel_12.1.0.2.0-2_amd64.deb ...
Unpacking oracle-instantclient12.1-devel (12.1.0.2.0-2) ...
Setting up oracle-instantclient12.1-devel (12.1.0.2.0-2) ...

Talking to the Oracle

So, at this point in time we have a bunch of stuff installed in all sorts of random (read: Oracle-like) locations. The database itself is under /u01/app/oracle/product/11.2.0/, and all the other packages seemed to have gone into /usr/lib/oracle/12.1/client64/ and /usr/include/oracle/12.1/client64/. The first task is now to start the database server. For this we can rely on the scripts we installed earlier on. However, before we proceed, one little spoiler: we need to ensure the scripts can find awk at /bin/awk (these days it lives in /usr/bin/awk). For this we can do a swift (and brutal) hack:

# ln -s /usr/bin/awk /bin/awk

Now we can configure it. I accepted all of the defaults, and setup a suitably sensible password:

# cd /etc/init.d/
# /etc/init.d/oracle-xe configure

Oracle Database 11g Express Edition Configuration
-------------------------------------------------
This will configure on-boot properties of Oracle Database 11g Express
Edition.  The following questions will determine whether the database should
be starting upon system boot, the ports it will use, and the passwords that
will be used for database accounts.  Press <Enter> to accept the defaults.
Ctrl-C will abort.

Specify the HTTP port that will be used for Oracle Application Express [8080]:

Specify a port that will be used for the database listener [1521]:

Specify a password to be used for database accounts.  Note that the same
password will be used for SYS and SYSTEM.  Oracle recommends the use of
different passwords for each database account.  This can be done after
initial configuration:

Confirm the password:


Do you want Oracle Database 11g Express Edition to be started on boot (y/n) [y]:y
y

Starting Oracle Net Listener...Done
Configuring database...
Starting Oracle Database 11g Express Edition instance...Done
Installation completed successfully.

Notice how your port 8080 has been hogged. If you are using it for other work, you may need to move the Oracle Application Express server to some other port. At any rate, after this I could indeed see a whole load of Oracle processes running:

$ ps -ef | grep oracle
oracle   20228     1  0 22:35 ?        00:00:00 /u01/app/oracle/product/11.2.0/xe/bin/tnslsnr LISTENER -inhe
oracle   21251     1  0 22:36 ?        00:00:00 xe_pmon_XE
oracle   21253     1  0 22:36 ?        00:00:00 xe_psp0_XE
oracle   21257     1  0 22:36 ?        00:00:00 xe_vktm_XE
oracle   21261     1  0 22:36 ?        00:00:00 xe_gen0_XE
oracle   21263     1  0 22:36 ?        00:00:00 xe_diag_XE
oracle   21265     1  0 22:36 ?        00:00:00 xe_dbrm_XE
oracle   21267     1  0 22:36 ?        00:00:00 xe_dia0_XE
oracle   21269     1  0 22:36 ?        00:00:00 xe_mman_XE
oracle   21271     1  0 22:36 ?        00:00:00 xe_dbw0_XE
oracle   21273     1  0 22:36 ?        00:00:00 xe_lgwr_XE
...

To the untrained eye, this seems like a healthy start; but for more details, there are also a bunch of useful logs under the Oracle directories:

# ls -l /u01/app/oracle/product/11.2.0/xe/config/log
ls -l /u01/app/oracle/product/11.2.0/xe/config/log
total 20
-rw-r--r-- 1 oracle dba 1369 Feb 23 22:36 CloneRmanRestore.log
-rw-r--r-- 1 oracle dba 7377 Feb 23 22:36 cloneDBCreation.log
-rw-r--r-- 1 oracle dba 1278 Feb 23 22:36 postDBCreation.log
-rw-r--r-- 1 oracle dba  227 Feb 23 22:36 postScripts.log

Now, at this point in time, if all had gone according to plan we should be able to connect to our new instance. A typical trick in Oracle is to use tnsping to validate the setup. For this we need to know what to ping, and that is where TNS Names comes in handy:

$ cat /u01/app/oracle/product/11.2.0/xe/network/admin/tnsnames.ora
# tnsnames.ora Network Configuration File:

XE =
  (DESCRIPTION =
    (ADDRESS = (PROTOCOL = TCP)(HOST = lorenz)(PORT = 1521))
    (CONNECT_DATA =
      (SERVER = DEDICATED)
      (SERVICE_NAME = XE)
    )
  )
...

The magic word is XE (the net service name, i.e. what we will be connecting against). Now we can simply do:

$ . /u01/app/oracle/product/11.2.0/xe/bin/oracle_env.sh
$ tnsping XE

TNS Ping Utility for Linux: Version 11.2.0.2.0 - Production on 23-FEB-2017 22:52:04

Copyright (c) 1997, 2011, Oracle.  All rights reserved.

Used parameter files:


Used TNSNAMES adapter to resolve the alias
Attempting to contact (DESCRIPTION = (ADDRESS = (PROTOCOL = TCP)(HOST = lorenz)(PORT = 1521)) (CONNECT_DATA = (SERVER = DEDICATED) (SERVICE_NAME = XE)))
OK (0 msec)

Success! Worth noticing that the first step was to call oracle_env.sh to bring in all the required environment variables of our Oracle setup.

The final test at this stage is to ensure we can connect with SQL Plus. For this we will just rely on the SYSTEM user.

$ sqlplus SYSTEM@XE

SQL*Plus: Release 11.2.0.2.0 Production on Thu Feb 23 22:56:31 2017

Copyright (c) 1982, 2011, Oracle.  All rights reserved.

Enter password:

Connected to:
Oracle Database 11g Express Edition Release 11.2.0.2.0 - 64bit Production

SQL> select table_name from all_tables where rownum < 4;
select table_name from all_tables where rownum < 4;

TABLE_NAME
------------------------------
ICOL$
CON$
UNDO$

And there you go. We have an absolutely minimal, bare-bones setup of Oracle Express running on Debian Linux. Worth bearing in mind that if you want to make use of SQL Plus from within emacs you must make sure you start emacs on a shell that has all the variables defined in oracle_env.sh.

Conclusions

In this first part we simply setup Oracle Express, and the client libraries. We also managed to prove that the setup is vaguely working by connecting to it first at a low-level via TNS ping and then at a proper client level using SQL Plus. The next part will wrap things up with the Oracle setup and then move on to ODB.

Created: 2017-03-25 Sat 19:54

Emacs 25.1.1 (Org mode 8.2.10)

Validate